
Meet Your Guest Blogger
Hi there! My name is Lisa, I am a lifelong amateur equestrian with a passion for leatherwork and helping others fit their tack. I run Gray Horse Leatherworks (@GrayHorseLeatherworks), creating custom leather goods and performing repairs. I am also a dual-certified bit and bridle fit consultant and I love sharing with others all I have learned!
I have two (gray) horses, a semi-retired pony I’ve had since childhood and a 7 year old Irish Sport Horse. I am based in Charlotte, NC and can be found competing in the show jumping arenas at Tryon and Carolina Horse Park.
What is the Goal?
There are two primary factors in considering the fit of both bits and bridles: welfare (which should
always come first) and biomechanics. All of the aspects I’ll cover here are rooted from one or both of
these key goals.
Ultimately we want to achieve a harmonious connection with our horses, and bits and bridles are
important tools for doing so. Since we first domesticated horses in 3500 BC we have learned a great
deal about how the type and fit of bits and bridles affect each horse individually, and I would like to
share some of the basics with you!
Preface – I will spare you all the history and theory, and will not dive into types/brands/use, this would
take volumes and often strikes up some controversy so I won’t subject Sarah and her blog to this 🙂
Bridle Fit
Foregoing an anatomy lesson, I will preface this section by saying this- no other part of the horse
has as many sensitive areas as the head. This in itself should draw attention to the importance of
proper bridle fit as it relates to the key welfare and biomechanics goals I brought up earlier.
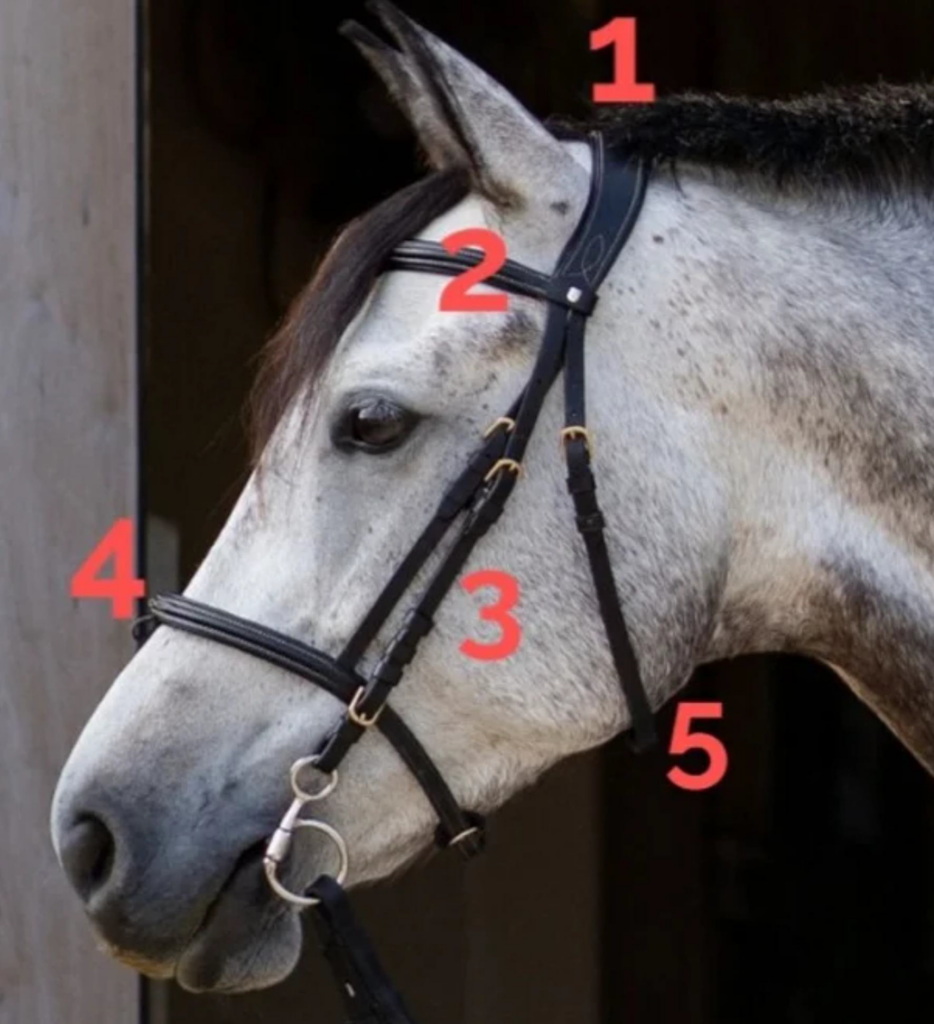
1. Crown Piece
This component bears the weight of the bit and bridle and applies pressure to the poll and area behind the ears.
Correct Fit:
- “Splits” where the billets for the cheek pieces and throatlatch begin should branch off below the base of the ear.
- This must sit flush with the horse. Any areas that gap or bridge (like some poll relief bridles) will create additional pressure points elsewhere.
- Four fingers (flat) should fit between the crown piece and the horse’s poll when the entire bridle is “done up”. If you can’t do so comfortably, it is likely the noseband and/or other components are too tight.
- General Recommendation: Don’t be fooled by marketing of the over-engineered anatomical crown pieces. They are not made to fit every horse and can do more harm than good, unfortunately. You really can’t go wrong with a traditional straight crown piece with supple leather.
2. Brow Band
This, along with the throatlatch, serves as security for the bridle. This helps the bridle stay on the horse in the event of a fall or otherwise extreme circumstance.
Correct Fit:
- Should be able to fit a flat hand between the horse’s forehead and the browband without
any tension in the leather. Too snug and this will press the crown piece into the back of the
ears and could pull the cheek pieces towards the eyes & TMJ. - Placement between the base of the ear and the TMJ.
- General Recommendation: When in doubt, size up. If ordering a browband separately, make
sure the channel width is the right size for your crown piece so it stays in place.
3. Cheek Piece
This connects the bit to the bridle.
Correct Fit:
- Buckles should sit eye-level. If too high, this will put pressure on the sensitive TMJ, or worse, can push the browband into the ears.
- Cheek piece and cavesson (noseband) buckles should not be stacked, as this creates an obvious pressure point. A lot of sensitive nerves run along this area.
- General Recommendation: If your cheek pieces are too long or short but your bridle otherwise is an appropriate size, ask your local leathercraft expert to make adjustments.
4. Cavesson (Noseband)
Originally created for several reasons: to prevent horses breaking their jaw in the event of a fall in battle or over fences, as a combination halter/bridle for trail and military horses, and as a restricting device to induce pain and increase perceived sensitivity (in “ancient times” a drop noseband with sharp metal inlays would be applied tightly, thought to increase sensitivity to the bit). Today, this is used for attachments (like martingales and nose nets) and is required in some competitions.
Correct Fit:
- Should be able to fit two fingers (stacked) between nasal bone and noseband when fastened.
- Noseband should be placed more than 1 thumb’s width from the facial crest and more than 4 fingers above the nostril. Any lower and pressure from the noseband will be at high risk of fracturing the delicate nasal bone.
- General Recommendation: Ditch the noseband when hacking/schooling at home. Even when fit correctly this can exert a tremendous amount of pressure when the horse performs natural movements like yawning or chewing.
5. Throatlatch
This, like the brow band, serves as security for the bridle.
Correct Fit:
- Should be able to fit a fist between the horse’s jaw and the throatlatch.
- Ensure the browband sits above the “splits” where the throatlatch breaks off from the crown piece else the throatlatch will push it up into the ear, which can pinch.
- General Recommendation: While we don’t want this snug, too loose can be irritating for your horse as it “flops” around and can increase the risk of getting caught on something.

Bit Fit
The mouth is undoubtedly a very sensitive part of the horse and what is so often left unconsidered when selecting a bit for a horse is their unique interdental conformation. This is where a certified bit fitter (like myself) really comes in handy as each horse can, and should, be assessed as an individual. I can share some generalized basics on fitting bits, however, some of which may come as a surprise and I hope I can dispel some myths.
1. Mouthpiece Size
There are some gadgets on the market to help you measure your horse’s bit size, but because some manufacturers measure their bits differently and mouthpiece contour can affect this, it is best to have a bit fitter evaluate if you are looking to size a new bit. On your own you can check your bits to make sure they fit correctly:
- For a loose ring bit, you should have approx. 1/4″ between the horse’s lips and the hole which the loose ring passes through, on each side.
- For a fixed cheek bit, you should have roughly 1/8″ between the horse’s lips and the cheek of the bit.
2. Mouthpiece Thickness
I am sure you have heard that thick bits are more kind than thin bits. While this is generally true for pressure distribution, you must remember that horses were not made to have bits in their mouth. In fact, some horses have no room at all for a bit. A study was conducted that showed, on average, horses can
accommodate a 11mm – 17mm diameter mouthpiece
- Link here: https://www.ncbi.nlm.nih.gov/pmc/articles/PMC9133790/)
- Too thin (<10mm) and this will be quite sharp. This can do a lot of damage – particularly with a rough mouthpiece (like a twisted wire) and with unsympathetic hands.
- Too thick (>18mm) and this will put pressure on the palate, compress the tongue, and can have a numbing effect – even without pressure from the reins.
3. Position in Mouth
I am sure many of you have heard of the “two wrinkle rule”. Problem is, every horse has a different length of smile and degree of elasticity to their lips. So “two wrinkle” placement may be too high or too low in their mouth. The correct placement can be a bit tricky and depends on mouthpiece type as well, so you will want to have a certified fitter evaluate. On your own, however, some tips:
- If your horse has canines (geldings will but some mares do too) make sure the bit is positioned high enough so it cannot contact these teeth no matter what forces are acting on it.
- The bit should not be so high that it contacts the molars.
- A snaffle bit should not be so high that there is no slack in the cheek pieces when rein
tension is applied.
4. Leverage Cheek Pieces
Snaffles apply direct action to the mouth, whereas leverage bits like pelhams and weymouths work on indirect pressure – they have a purchase and shank that rotate the mouthpiece and leverage resistance from the poll and jaw to apply pressure to the mouth. The previously mentioned rules of fit apply, but the curb chain (or back strap) must be fit correctly in order for the leverage system to work as intended.
- Curb chain should lie flat and be adjusted so that when rein tension is applied, the cheek
piece does not rotate more than 45 degrees. - Purchase (part of the cheek piece above the mouthpiece) should not exceed ⅓ the length of
the shank (part of the cheek piece below the mouthpiece).
If you are curious to learn more about different cheek pieces, mouth pieces, how a gag vs. leverage bit works, or a deep dive on another bit/bridle topic, let us know, we can do a “part two”! Happy to answer any questions along the way.
Enjoy the ride!
Lisa Plumley
www.GrayHorseLeatherworks.com
@GrayHorseLeatherworks


LEAVE A COMMENT
0 Comments